mass air flow sensor clean or replace

Toyota Maintenance: Tacoma and 4Runner 30K Mile Service By: Mark Griese - 12/2003 This table lists items found in the Scheduled Maintenance Guide for the four wheel drive models that were being serviced. You must consult the documentation that came with your vehicle to determine what is appropriate for your Toyota. 30,000 mile / 24 month maintenance items Engine oil and filter Lubricate and Re-torque driveshafts Ball joints and dust covers Brake lines and hoses Brake linings/drums and brake pads/discs Fuel lines, connections, and vapor vent system hoses Fuel tank cap gasket Steering gear box, linkage, and boots Exhaust pipes and mountings ADDITIONAL ITEMS FOR SPECIAL OPERATING CONDITIONS: Replace Transmission fluid or oil Replace Transfer case oil Inspect Body/Chassis nuts and bolts These items also apply to the 60K, 90K, and 120K maintenance intervals. Also see SUPPLEMENTAL MAINTENANCE ITEMS These items, while not recommended by Toyota, are also part of a good preventive maintenance program.

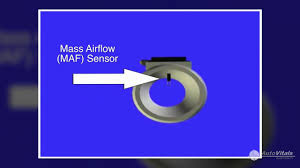
With the engine idling at normal temperature, pull the PCV valve from the valve cover and put your finger over the end to determine if it is pulling a vacuum. Be careful, as the valve may be hot. If no vacuum is detected, remove the valve from the hose to see that there is vacuum in the hose. If there is vacuum in the hose, the valve is defective and needs to be replaced. If there is no vacuum in the hose, and the hose does not appear to be defective, contact a professional mechanic. A dirty MAF sensor can cause rough idling or even a check engine light. The cleaning procedure is simple and inexpensive. Those owners who have installed a re-usable air filter (such as the TRD unit) will likely need this service sooner than others, since a small amount of the oil used on these filters is sucked in the intake tube and tends to coat the MAF sensor. For all models, the MAF sensor is located just after the air filter housing (see photos above). A full size pair of pliers will be helpful in depressing the lock on the electrical connector, just remember it's plastic, only squeeze enough to disengage it.

Due to the layout of the components on various models, a 90 degree screwdriver may be required to remove the screws holding the sensor in the intake tube. Once the sensor is out, use electronic cleaner to spray the dirt off of the fine thermistor wires inside the unit. If you are going to use the little plastic tube provided with the cleaner, do not stick it down inside the sensor. The wires are very delicate and this is a very expensive sensor to replace. Once clean (see the photo below to know what a clean sensor looks like), let it dry, re-install it, and re-attach the electrical connector so that it locks into place. No other computer or electrical considerations are necessary, either before or after the service. If you had a check engine light prior to this service, you can pull the EFI fuse in the fuse box to reset the code (see photo above for fuse box location). If the check engine light returns, take the vehicle to a professional for diagnosis. Over time the throttle body will become contaminated with gum, varnish and oil around the throttle (butterfly) valve.

Cleaning the throttle body is easy to do during the spark plug change since the air intake tube will already be removed. Please see the instructions and photos above for removing the intake. After the intake is off, open the valve by using your hand to actuate the throttle (where the cable is attached). Place a rag under the butterfly, causing it to stay partially open. The idea is for the rag to catch the majority of the runoff containing the residue.
do air purifiers remove smellsSome have reported problems from too much residue running down into the small port at the bottom of the throttle opening.
air purifier price in kolkataSpray an approved cleaner on the butterfly valve while moving it open and closed.
air cleaner ashtrayOpen the throttle again and pull the rag out.

Soak the rag with cleaner and wipe away the residue as far into the throttle body as you can reach. Re-install the intake tube. I used CRC Fuel Injection Air Intake Cleaner, but many brands of cleaners are available for this service. Apparently Toyota considers the fuel filters to be good for the life of the vehicle, since they are never mentioned in the Scheduled Maintenance Guide. Some owners may still want to change the filters, so I'll include the instructions here. First and foremost, whenever working on a pressurized fuel system, safety must be a priority. Have a fire extinguisher nearby, wear gloves and safety glasses, provide adequate ventilation, and don't smoke or use a shop light anywhere near the work area. After the filter has been removed it will still contain a considerable amount of fuel. I left mine outside for a few days to air out before disposing of it. The V6 fuel filter is located underneath the vehicle just about where the driver sits. You will need a drain pan, a 19mm wrench, a 14mm line wrench, and 10mm wrench or socket for the mounting bracket.
There is a shield on the 4Runner that can be removed with 12mm wrench or socket. Place the drain pan under the filter, hold the filter with the 19mm wrench and use the 14mm line wrench to loosen the fittings on both ends of the filter. Once loose, the fuel will begin dripping out, which will depressurize the system. After a few minutes, continue loosening the fittings to speed up the drainage. Then completely remove them, unbolt the bracket, and bolt in the new filter. Leave the mounting bolts loose until the threads in the fittings have been started. It took me two attempts to get the fittings tight enough to stop the leaks. I have not changed the filter on the I4. It is located on the driver's side of the engine, underneath the intake manifold. It uses banjo fittings on each end, so the filter should come with four new sealing washers. Because of where this filter is mounted, the engine should be completely cool before beginning. Click for Main Maintenance Page IP address: 54.190.220.233Time: 2016-09-25T15:47:26ZURL: http://www.youtube.co.id/watch%3Fv%3DH0hTOJUj5yw