where to spray air intake cleaner

Sorry, this page doesn't exist. © Vuclip, Inc. 2007-15. Five Minute Finances is a series of tips on how you can save significant money or reorganize your financial life in just five minutes. These tips appear Monday, Wednesday, and Friday on The Simple Dollar. Tip #1: Clean your car’s air filter In general, most cars should have their air filter replaced every 15,000 miles. What most people don’t realize, though, is that their car’s air filter begins to get clogged with dust after just a few thousand miles – and when it begins to get clogged with dust, the air flow under your hood slows down and your automobile quickly becomes less fuel efficient. How much less efficient? A dirty air filter, even after just 5,000 miles after a change, can cost you up to 7% of your gas mileage. If you are driving a car that normally gets 20 miles per gallon, your car is now getting 18.6 MPG. Over the next 10,000 miles, that’s an extra 37.6 gallons of gas, which with gas at $2.10 per gallon, costs you $79.03!

Cleaning off your air filter is easy (can you turn a wing nut with your hand? If you can, you can handle this) and it only takes about five minutes. All you need is your car, your owner’s manual, and a vacuum cleaner. I usually do it when vacuuming out my car normally, so I usually don’t even have to worry about pulling out my vacuum, making it a two minute task.
air cleaner kit for harley davidson 1. Open your car’s hood.
air duct cleaners inc chicago 2. Take a peek in your car’s owner’s manual to see exactly where the air filter is.
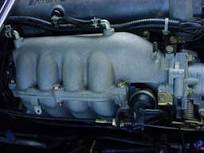
electronic air cleaner ceiling mountedIt’s usually right on top under the hood and easy to reach. On my truck, it happens to be in a round metal container that’s right in front of my face;

on other cars, it can be square or rectangular, but still right in front of you. Locate it under the hood. 3. Take off the top of the metal container that the filter is in. It’s either held in place by some clamps that you can flip up with your finger or a wing-nut that you can unscrew with your hand. 4. Pull out the filter. It’s just sitting in there, so you should be able to pick it right up. 5. Use a vacuum cleaner to clean off the filter. I usually tap it a few times on my car’s bumper, then vacuum it for a minute or so. 6. Vacuum out the inside of the chamber where the air filter sits. There’s usually a bit of dust in there. Vacuum it for fifteen seconds or so to get any dust you see. 7. Wipe off the inside of the chamber with a rag or a paper towel. You should be able to get a bit more grime with this. Don’t scrub it or anything, just get any grime that’s easily accessible. 8. Put the air filter back in place, put the cover back on the air filter chamber (don’t forget to put the clamp or screw back in place!), and close your hood.

I recommend doing this every 5,000 miles or so. If you ordinarily have a mechanic do this, you can do it yourself 5,000 miles after an air filter change. Once you do it a couple of times, you’ll probably be fine with just changing your air filter yourself, which will save some additional money if you have your mechanic do it. Time spent: Five minutes Money saved: At least $79 Get 2x Points on All Your Travel and Dining >> A Great Way To Pay Off Debt With A No Interest Credit Card Get rid of high interest debt with a 0% balance transfer credit card Get A Free Trip This Summer by using the Right Card Earn credit card points toward your favorite ways to travel Foreign Transaction Fees with These Top Picks Save money and expand your travel budget by packing any one of these cards on your trip 6 Credit Cards That Can't Be Beat in 2016 A comprehensive guide to maximizing rewards and getting paid back for everything you buyOf the two major components used for internal combustion, fuel and air, it's the latter that is most often overlooked by the average driver.

This is ironic when you consider that a properly proportioned fuel charge is 14.7 parts air for every one part of fuel. What is the basis for this automotive respiratory-system neglect? Like so many things in life, it comes from a combination of factors, not the least of which is the need to put gas in our cars regularly while rarely, if ever, dealing with the air-intake system. The average air filter can go 10,000 miles without needing to be changed, but the majority of us have to visit a gas station at least once a week. But what, if anything, can the average consumer do to improve his vehicle's respiratory system? That is where K&N comes into play.K&N Engineering has been manufacturing air filters for over 30 years. The company uses an oil-impregnated, cotton-gauze filter element surrounded by a wire mesh. This design is superior to a paper element because it allows for superior airflow while maintaining effective air filtration. The cotton material lets air pass through it easily while trapping particles in the sticky, oil-covered fibers.

This system works for up to 50,000 miles, at which point the filter is cleaned, re-oiled, and ready for another 50,000 miles. These filters, by the way, are emissions legal in all 50 states and do not void the manufacturer's warranty.While the initial cost of a K&N Filter is much higher than a standard-replacement paper filter, the cost over time is less because all K&N Filters come with a 10-year/1,000,000-mile warranty. This reduced maintenance and cost would make K&N Filters attractive even if they supplied the same level of airflow as a paper air filter. But airflow tests on K&N products have shown superior airflow, even when the filters are at their 50,000-mile cleaning interval.When that 50,000-mile cleaning interval does come, even the least mechanically inclined individual can perform it in less than an hour. to learn more about how K&N Filters work. To see how easy they are to clean, read on.1.) A K&N Filter needs to be serviced every 50,000 miles. More frequent service may be necessary under extreme conditions such as off-road use where dusty conditions are prominent.

Use only K&N brand Air Filter Cleaner and Air Filter Oil when servicing a K&N product.2.) Tap the air filter gently against a hard surface to dislodge loose dirt. Always tap a filter on its base or side and never tape a filter's edges because this may damage the element. Follow this up by gently brushing the filter with a soft bristle brush. An old toothbrush will work well for this.3.) Use K&N Air Filter Cleaner in either spray-on or liquid form. If a spray is used, be sure to coat the entire element and allow it to soak for 10 minutes. Use the liquid form by filling a pan to a level where the filter element is submerged beneath the cleaner. If a large, round element is being cleaned, rotate it through the fluid and remove it. After submerging the filter element in the cleaner, remove the filter and allow it to soak for 10 minutes.4.) Rinse the element with low-pressure water such as from a household faucet. Do not use high-pressure spray as this will damage the element. Always flush from the clean side to the dirty side.
This works to remove dirt from the filter rather than driving it further into the filter.5.) Shake excess water from the filter and allow it to air dry at room temperature. Carefully hanging the filter in the outside air works well. Do not use compressed air or a heat source to dry the filter; these will damage the element, rubber base and end caps.6.) Re-oil the filter with K&N Filter Oil. Use only K&N Filter Oil as any other form of oil can degrade the element's filtering ability. A K&N Filter will not function properly without sufficient oil and will require more frequent re-oiling of the filter's clean side in between cleanings.7.) Spray K&N Filter Oil into the element's pleats from a distance of 10 inches. Spray each section of pleats only once until the reddish oil color becomes apparent. Let the filter sit for 10 minutes and respray any areas that are still white. You can also apply K&N Oil from a squeeze bottle onto each pleat.8.) Re-install your K&N Filter into the filter housing.