how to clean your laptop with compressed air

This document pertains to HP notebook PCs, also referred to as laptops. This video shows how to reduce heat inside your laptop computer Click here to see this video in full screen on YouTube. Symptoms of heat issues and causes of excessive heat Windows 10, 8, 7, Vista, XP Windows 95, 98, and ME Step 1: Removing dust and lint by cleaning vents Figure : Dust accumulation Figure : Dust accumulation around a fan Figure : Side vents Figure : Bottom vents Step 2: Ensuring proper space for ventilation Step 3: Updating the BIOS After releasing a laptop, HP regularly provides updates for the BIOS and other components. Check for BIOS updates and install them using instructions in the HP support document Updating the BIOS. Step 4: Using HP CoolSense technology HP CoolSense technology is a feature in some HP notebook (laptop) computers that combines hardware, software, and mechanical design to dynamically manage the temperature of your laptop computer.

HP CoolSense uses a motion sensor in your laptop to sense when your laptop is being used in a stationary or mobile setting, and automatically adjusts the laptop performance and fan speed to keep the computer cool. You can set HP CoolSense software to your specifications. For more information, see HP Notebook PCs - HP CoolSense Technology. Step 5: Placing the notebook in a cooler room Step 6: Testing for hardware failure Testing for Hardware Failures (Windows 10, 8) Testing for Hardware Failures (Windows 7) Checking Your Notebook PC Using the HP System Health Scan for laptops running Windows Vista Fan Is Noisy and Spins Constantly, PC Is Warmer than Normal Tips for Using, Carrying, and Protecting Your HP Notebook PCIf you’re using a laptop, just pause for a second and try to remember the last time you cleaned it. I don’t mean giving it a quick sleeve-wipe, I mean a real, legit cleaning. Don’t worry boo, I got you. Your laptop is one of the germiest places in your home and according to some reports, laptops and more specifically the keyboard attached to your laptop has more germs on it than a toilet seat (
) and when’s the last time you remember spending a few hours tapping your fingers all over your toilet seat?
So with this in mind, I’m going to show you how to defunkify your laptop. My method here is the right way, the by the books way, not some hack-your-way-to-a-cleaner-laptop deal. This is what the people at the manufacturers tell us to do. So let’s crack it open and get to it. For this cleaning job you’re going to need Microfiber cloths – we’re going to be using a regular weave microfiber cloth (texture resembles a terry towel) for everything but the screen where we’ll be using a flat weave microfiber cloth (and soon, we’ll have our own (seen in this associated video) for sale!)
e tech air purifier Mild dish soap – we’re not fooling around with any aerosol sprays, solvents, abrasives and for goodness sake NO GLASS CLEANER – otherwise you risk damaging your laptop’s finish
air purifier efficiency
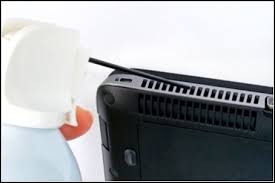
Distilled water – this is the ONLY liquid you should use on your laptop screen since alcohol or ammonia solutions can damage the finish. We’re using distilled water instead of regular tap water since distilled water won’t leave any streaks behind – although, tap water will also work fine Compressed Air – to blast out all those crumbs from sandwiches, granola bars, bowls of cereal, late night poutine, and crunchy snack mix. Oh and I almost forgot to mention dead skin cells, dust, fingernails, and the like.
air duct cleaning warnings Rubbing Alcohol – this is only to be used on the keyboard but it’s super effective since it dries quickly. It’s great for tackling finger oils. Dish soap and water works, but if you have this handy, why not use it? Pipe Cleaner – to clean out any ports or vents, just bend and go! Before we begin let’s talk about a few Do’s & Do-not’s we should remember when cleaning our laptop

DO shut down and turn off your laptop off completely and be sure to unplug everything from all the ports. DO NOT spray anything directly on your computer. This even goes for the exterior – you’d be surprised how little moisture it takes to mess things up in there. DO read your user manual. There are usually always care instructions in the user manual and if you’ve misplaced yours, check the manufacturer’s website – if anyone knows how to care for your laptop properly it’s probably the people who made it (and me). DO NOT remove your laptop keys unless you know what you’re doing. My suggestion would be to consult Google before prying off your keys seeing as how there are more than a few horror stories about not being able to get them back on all that easily. So do your research first! DO make sure to clean your fan vent if your laptop has one. These can get quite clogged over time and can lead to overheating if air can’t get in or out of your laptop.
Now that all of that is out of the way, let’s get to the cleaning Whip up a simple solution of 1 cup distilled water and a drop of dish soap – simply dip your regular weave microfiber cloth into this solution and wring it out until it is damp dry. You want to use as little liquid as possible. Then just use this cloth to wipe clean the exterior case of the laptop being careful to not get any moisture in the openings or ports. I use a simple “s” pattern, and use a dry portion of the cloth to quickly buff up any residual moisture. Do this on the top and bottom of the exterior.. I’m not going to be removing the keys for this cleaning, I don’t recommend it. Compressed air should suffice, and if you really need to get under the keys, you can employ a cleaning toothbrush (dry, of course), to brush out any debris. If you do this, hold the laptop vertically so that debris can fall down as opposed to back into the keyboard. Ok, back on track. Tip your (open) laptop at a slight angle to allow for the debris to fall onto a flat surface.

Get the can of compressed air out and start doing short blasts, working from top to bottom in the direction you’re tipping the keyboard. You’ll see a LOT of crumbs and other stuff (see above) start to fall out. Ok, we’re over it. Once all the debris is gone, you can use the same mixture of dish soap and distilled water if you’d like, or may I also suggest rubbing alcohol for this task, since it drys SUPER quick and is just as effective as dish soap on oily residue. To clean the keys, just lightly dampen the corner of a regular microfiber cloth with straight rubbing alcohol or that soap and water mixture, wring very well, and carefully wipe the keys, remembering to get the sides. Work in sections, and use a dry section of the cloth to buff each area dry. No moisture shall be left behind! For the trackpad and surrounding areas, you can just use the dish soap and distilled water mixture, applied to a regular microfiber cloth, wrung out well. Work in sections, wiping the area with the damp part of the cloth, and quickly buffing dry with a dry portion of the cloth.

To clean the screen, all you need is a soft, flat weave microfibre cloth and really, that’s it! You don’t need any fancy screen cleaners ($$$). A flat weave cloth can’t cling onto any debris, so you needn’t worry about any scratches. Work in sections and use your pointer finger, covered in the cloth to gently buff off any stubborn spots. Your screen should come out nice and clean. If, for whatever reason, there is something on your screen which can’t be removed by a dry cloth, just dampen the tiniest corner of your flat weave cloth with water, quickly wipe the sticky spot and buff with a dry section of the cloth immediately after. These screens have fancy coatings and you don’t need to go messing with that! Quick note: tap water is fine, distilled is better. You can get a bottle at the drug store or a grocery store – it’s not expensive. It’s essentially water which has all of the minerals extracted from it (read: no streaky business). These little things need some love, too.