dvd lens cleaner for macbook pro
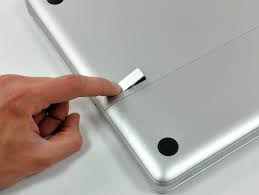
MacBook Pro 15" Unibody Late 2008 and Early 2009 Optical Drive Replacement This guide will show you how to replace the SuperDrive from your laptop (requires a SATA SuperDrive). With the case closed, place the Unibody top-side down on a flat surface. Depress the grooved side of the access door release latch enough to grab the free end. Lift the release latch until it is vertical. The access door should now be raised enough to lift it up and out of the Unibody. Be sure the access door release latch is vertical before proceeding. Grab the translucent plastic tab and pull the battery up and out of the Unibody. If the latch is depressed it will lock the battery in place. Remove the following eight screws securing the lower case to the chassis: One 5.4 mm Phillips screw. Three 14 mm Phillips screws. Four 3.5 mm Phillips screws. Using both hands, lift and remove the lower case off the upper case. Disconnect the camera cable by pulling the male end straight away from its socket.

Deroute the camera data cable from the channel in the optical drive. Use a spudger to pry the optical drive connector straight up off the logic board. Remove two 8 mm Phillips screws securing the camera cable bracket to the upper case. The rightmost screw may remain captive in the camera cable. Lift the camera cable bracket out from the upper case.
buy air purifier malaysia Remove the following three Phillips screws securing the optical drive to the upper case:
cd lens cleaner walmart One 3.5 mm Phillips screw.
florida air duct cleaners complaints Two 2.5 mm Phillips screws. Lift the optical drive from its left edge and pull it out of the computer. Remove the optical drive cable by pulling it straight away from the optical drive.

If you have a CD or any other object jammed in your optical drive, we have an optical drive repair guide. Remove the two black Phillips #0 screws securing the small metal mounting bracket. Transfer this bracket to your new optical drive or hard drive enclosure. 61 other people completed this guide.Tonight I went to update my copy of Diskwarrior to version 4.4. That required me to download an updater from the Alsoft website and then I needed to insert my original DVD and once it copied and modified it, I needed a blank DVD to burn the updated DVD. I’ve done it before so I didn’t really think twice. That is, until it wouldn’t burn on my MacBook Pro. I tried three different brands of DVDs and got the same result. I then decided to burn straight from the Mac OS X operating system and got this error message: That’s an error message that sounds pretty terminal. Given that my Macbook Pro is three years old, I first assumed that it was a hardware problem such as a bad DVD drive.

But I decided to take a crack at trying to fix it myself. I reasoned that because the DVD burner could read discs, it wasn’t dead. I also used it infrequently (like 4 or 5 times a year) to burn discs so I reasoned that I didn’t kill the drive from overuse. Thus It seemed reasonable to assume that perhaps the lasers that were responsible for burning were dusty or something like that. I had seen that in other computers before so it made sense. So I checked to see what DVD burner was in the MacBook Pro using System Profiler and found that it was a “MATSHITA DVD-R UJ-868” drive . I Googled the drive for some pictures and found that the lasers were about a inch inside the drive slot. Armed with that info, I tried using compressed air to clean the lasers. That’s something that worked for me on other computers, but it didn’t work this time. When I tried to burn a disc, I got the same error. So I tried something different. I took a thin microfiber cloth and made it moderately damp with alcohol.

I then wrapped it around a credit card so that it was flat enough to fit into the drive slot. I slid the credit card wrapped in the damp microfiber about a inch into the drive and moved it back and forth for about 3 minutes. I then let it dry for about 5 minutes and tried burning.I could burn from OS X and I could complete the update process of Diskwarrior. I can only assume that even though there’s what looks like to be two pieces of felt covering the drive slot, dust and other contaminants must be able to sneak into the drive which affects how the drive operates. That says to me that perhaps Apple needs to redesign this slot so that it keeps dust out. I’ve seen one of the latest Macbook Pros and it’s still the same sort of design. Perhaps if Apple is reading this, they might want to consider it the next MacBook Pro they make. This entry was posted on August 6, 2012 at 11:33 pm and is filed under Tips with tags Apple, Macintosh. You can follow any responses to this entry through the RSS 2.0 feed.

You can leave a response, or trackback from your own site. Looks like you didn't complete your reservation. Do you want to If you need help making your reservation, call 1-866-237-8289. Free shipping* on orders over $25 (excludes products with ) Earn Reward Zone points on all your purchases Insignia 3.5 oz Cleaning Duster Insignia 8 oz Cleaning Duster - 2 Pack Memorex 16X 4.7GB DVD-R - 10 Pack Was this information helpful? More about Customer Reviews Positive vs. Critical Reviews Rate & Review this product Tell others about your experience with this product. Cd Laser Lens Cleaner My old Yamaha cd player was skipping and I thought I'd try the lens cleaner. I tried it several times, but it didn't work. Perhaps there was something else wrong with the unit. It was cheap enough to give it a try, and I will use it on the new Sony 5 disc player that I bought for a reasonable price. from prince albert sask it really easy to use and it works great on my blue ray and xbox one no more problems with them after using this product