clean macbook air for selling

Macs hold their value in the second user market very strongly compared to competing platforms. These are the steps you should take to prepare a Mac for sale. Before you begin,you need an idea of the potential value of the Mac you want to sell. Look at similar models on eBay and use Mac2Sell's online quotation site to help. Typically you'll clean up the exterior of your Mac, but you should also securely delete your data from your system, which means restoring it to factory settings. Before you delete your data you should back your existing information up. Time Machine users should have this backed up already, but it still makes sense to create an additional bootable clone of your Mac. To achieve this use Carbon Copy Cloner ($39.95) or SuperDuper ($27.95) to create a complete copy of the contents of your Mac on an external hard drive. You will be able to boot up this clone as and when you need any of the data the Mac you are selling contains. Then move to the next step.

iTunes users should remember to de-authorize iTunes before selling their systems. This is because you can only have five systems linked to your account. On the Mac you intend selling launch iTunes and select Store>Deauthorize This Computer. You will be asked for your Apple ID and password to complete this process. You can use the Deauthorize All Systems command within your iTunes account if you forget this step, but will then need to set all your existing Macs up all over again. Some Mac techs advise you check the status of FileVault encryption on a drive you intend to sell. Launch System Preferences and select Security & privacy>FileVault. If FileVault is not turned off on your Mac then click the padlock, enter your password to unlock the preferences and turn it off. Most Mac users run iCloud, Apple's system that keeps your contacts and other information synced between your Mac and iOS devices. If you are selling your Mac, then sign out of your account in the iCloud section of System Preferences, using the Delete from Mac command to remove all your synced data from your Mac.

Restart your system while holding down the Command and R keys until the Recovery Mode Utilities window shows up on the display. You will be using its tools to erase your drive.
electronic air cleaner clicking Launch Disk Utility in Recovery Mode and choose your Startup Disk in the left hand sidebar.
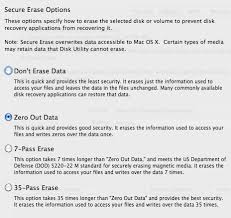
air purifier with essential oilsOnce you've selected the correct disk click the Erase button.
mass air flow sensor cleaner directionsWhile it takes longer, it's advisable to use the Security Zero Data One-Pass option, as it cleans your Mac most effectively. However, both commands will erase the data on your drive. This means that data will not be easily recoverable, which is why we recommend cloning the drive in step one.

When the deletion process is complete, exit Disk Utility. You now have a Mac with no easily accessible data -- not even an OS. You should reinstall the operating system for the next owner. Following these steps will ensure you leave no personal data on any Mac you sell.If you use social media and happen to be a Google+ user, why not join AppleHolic's Kool Aid Corner community and join the conversation as we pursue the spirit of the New Model Apple?Drop me a line via Twitter or in comments below and let me know. I'd like it if you chose to follow me on Twitter so I can let you know when fresh items are published here first on Computerworld.If you’re one of the lucky folks who have purchased a new Mac, you may be considering selling or donating your old Mac. Before getting rid of your beast, you’ll want to wipe the data from it, and slap on a fresh installation of OS X. It’s likely that you have already moved your old Mac’s data to your new machine. However, it’s always a good idea to have a backup around, just in case you find something you missed moving over during the transfer.

(Trust me, this ALWAYS happens!) If you’ve already been using Time Machine to backup your old Mac, you should be good to go. Just be sure not to write over your Time Machine backup when you start backing up your new Mac. Other backup options include such utilities as SuperDuper or Carbon Copy Cloner. These utilities can clone your Mac’s hard drive to an external hard drive. If needed, you can even boot your Mac from the clone on the external drive. If you used iTunes on your old Mac, remember that Apple’s iTunes only allows a certain number of devices to be authorized with any one iTunes account. Remember to deauthorize your old Mac, so you can easily add your new Mac to the account. To deauthorize a Mac, simply start iTunes, then click the “Store” menu selection. You’ll see a pull-down menu appear. Click “Deauthorize This Computer.” You will then need to enter your Apple ID information, and then click “Deauthorize.” Restart Your Mac and Boot Into Recovery Mode
Make sure your Mac is connected to the Internet, (you’ll need an Internet connection to reinstall OS X, unless you have an install disk or USB drive), then restart your Mac by clicking on the Apple in the upper-left hand corner of your Mac’s Desktop. Click “Restart” in the Apple menu. As your Mac begins to reboot, simultaneously hold down the Command + R keys. Hold these two keys down until the “Recovery Mode” screen loads. Erase Your Hard Drive Now, Select “Disk Utility,” and then click on “Continue.” Select your Mac’s Startup Disk in the sidebar on the left, and then click your mouse pointer on the “Erase” tab on the right-hand side of the window. If you are afraid someone might try to recover your data, click on the “Security Options…” button and select a higher form of security for erasing your data. (Note: This WILL take quite a bit longer than a normal erase.) Click the “Erase…” button and the utility will begin to erase your hard drive.