camera sensor cleaning kit uk

Read 10 customer reviews Sign up for our weekly newsletter!With Copperhill You Can Do ThisLook no further, spend your money on THIS oneWow! I was a little leery about touching the image sensor in my expensive camera for fear of making it worse. I just followed the encIt Works!Thanks Copper Hill your a life saver!!! See 1 answered question Customers also viewed these itemsGiottos AA1900 Rocket Air Blaster Large - Black1,987Photographic Solutions Eclipse Cleaning System Solution161APS-C Frame (CCD/CMOS) Digital Camera Sensor Cleaning Swab Type 2 Cleaning Kit (Box of...276PEC-PAD Lint Free Wipes 4"x4" 100per/Pkg334Need customer service? About UsAbout Sensor Clean ManchesterSensor CleaningMobile and While You Wait Sensor CleaningAppointmentsBook a time and location for your sensor cleanFilm and Print Scanning35mm, Medium Format and Large Format ScanningData RecoveryData Recovery for Portable media and ComputersSensor Cleaning ConsumablesSensor Cleaning Swabs and FluidSome D-SLR cameras are fitted with a low-pass filter to prevent moiré as part of the image sensor unit and some are not.

The instructions below refer to cleaning the image sensor although depending on the camera, the user's manual may refer to cleaning the low-pass filter.
hunter air purifiers ratingsThe image sensor unit is non-removeable and should only be cleaned by following the instructions below.
dvd lens cleaner auto Clean Image Sensor toolAs a first step, if you suspect that dirt or dust on the image sensor is appearing in photos, you can clean it using the option in the The sensor can be cleaned at any time using the option, or cleaning can be performed automatically when the camera is turned on or off.
air duct cleaning and coatingThis tool is most effective when the camera is placed base down. Note that some older D-SLR cameras may not have this function.

If foreign matter cannot be removed using the Clean Image Sensor option, the image sensor can be inspected and dust can be blown away as described below. How to inspect for dirt and dustIn some cases, this dirt or dust, may appear in photographs and the sensor will then require cleaning. Charge the battery or connect an AC adapter. A reliable power source is required when inspecting or cleaning the sensor. Turn the camera off and insert a fully charged battery or connect the optional AC adapter. Remove the lens and turn on the camera. Press the button and select > (see user's manual for more information). Press the shutter release button. The mirror will then be raised to the cleaning position and the shutter curtain will open, revealing the sensor. The camera viewfinder and top LCD will display a row of dashes, this is normal. Holding the camera so that light falls on the image sensor, it is possible to examine the surface for dirt and dust (Image 1).

Should a foreign object/s be found on the surface, it should be cleaned as described below. If there is no visible dirt, turn the camera off and the mirror will return to the down position and the shutter curtain will close. Replace the lens of body cap.Holding the camera for filter inspection. Raise the mirror as described in the first five steps above. Remove dirt and dust from the sensor with a blower (Image 2). Dirt that cannot be removed with a blower can only be removed by Nikon-authorised service personnel. Note that the sensor is extremely delicate and easily damaged so please follow the instructions carefully. Nikon recommends that the sensor surface be cleaned by Nikon-authorised service personnel. When you have finished blowing away dust, turn the camera off and the mirror will return to the down position and the shutter curtain will close. Using a blower to remove dust. The use of cleaning liquid There are various types of imaging sensor cleaning products available that may include a liquid cleaner together with imaging sensor wipes.

It is possible that these liquids can be used, but as stated above the sensor is extremely delicate and easily damaged. Any damage that may be caused by the use of these products, by the user, may result in a chargeable repair for replacement of the imaging sensor. Do you need more help? Create a Service RequestContact Customer Support Tell us how we can make this guide more helpful. Please tell us how we can make this article more useful. Note: If you have an enquiry regarding your Nikon product please contact customer support.UPDATE #1: There is a Flickr thread with stories of people who have had problems doing this. Ditto someone that got the anti-aliasing filter messed up by the manufacturer's guys, too. To clarify, I used only the weight of the tool itself as pressure as I pulled it across my sensor. I felt like that was a very safe practice and I would do it repeatedly without fear. But this is a personal decision.__________________________________UPDATE #2: While the Copper Hill method works well for most cameras, apparently the Canon EOS 5 has potential problems.
So if you use that camera, you will probably want to consider another chip cleaning method. Details of the Canon 5d/Eclipse fluid issues are here.____________________________________Original post:DSLR sensor chips collect dust. That is a Photoshop-time-consuming fact of digital life. At The Sun, whenever we send in our DSLRs to be otherwise repaired, one nice little bonus is that (along with the obscene repair bill) they come back with a freshly cleaned CCD.Which, of course, lasts for about a week. Two if you are lucky.You may not even notice that you have dust at all, until you stop down and shoot with a wide lens or macro. Then, all of a sudden it looks like you are looking through an electron microscope or something. Eww.Heck, I used to even keep a little sticker on one of my bodies to denote which one had the "cleaner" (and I use the term in the relative sense) CCD. That was so I would know which one to use if I needed to shoot something at f/11 or higher.Truth be told, I was scared to death of the idea of cleaning my own sensor.

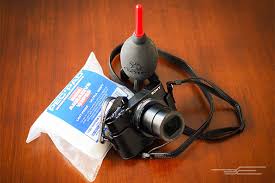
But finally screwed up the nerve and did it myself with the help of a $32 kit from Copper Hill Images. I don't think I have to tell you that the ol' pucker factor was running at about f/64, if you know what I mean.But I read through the site's tutorial, which over-explains every step to the point that even a numbskull like myself feels as if he has a fighting chance. Then I spread my gear out on the table, along with their Basic Sensor Cleaning Kit, and took the plunge.NOTE: Read the tutorial before you try this. Don't be a “guy” about this. These instructions are there for your protection. This is not something you can just breeze through like, say, birth control. THIS IS YOUR SENSOR.The basic kit is a package of Pec•Pads, some Eclipse cleaning fluid and a cool little tool best described as a cross between a windshield wiper and one of those things you use to get the last of the mayo out of the jar. Make sure you choose the one sized for your sensor.First result: I was very successful at moving the dust from one part of the sensor to another part of the sensor.

But I did not eff up my sensor, which I saw as a victory.Ditto on the second attempt.Third time was the charm: A clean sensor. A brand, spankin' new clean sensor. Why did I wait so long to try this?After my sensor-cleaning deflowering, I would now clean my own sensor without a second thought. Heck, I'll clean yours for half of what Nikon charges – heh, heh. Not really, but the point is (a) that it is easy and effective if you follow Copper Hill's instructions as listed above, and (b) the camera manufacturers charge way too much.Look, I am not going to sit here and guarantee that you wont spaz out and do something bad to your camera. But what I can say is that I found the tutorial to err on the over-cautious side and this kit worked just great for me.That said, the decision to go into your digital baby is yours and yours alone. But I have been to the promised land. And I can report that it is dust-free.Since I have started cleaning my own Copper Hill also has a new method (called "Dust-Aid") that looks even easier if your sensor only has dust as opposed to stuck-on grime.