best air conditioning coil cleaner

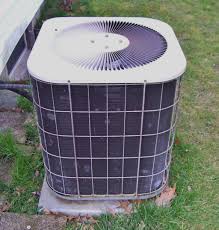
Twice in five years I’ve cleaned my outdoor AC condenser, and both times I’ve been amazed by the amount of dirt and leaves I’ve found. Fortunately, cleaning your outdoor coil is a task that any homeowner can accomplish, and it doesn’t take very long. A good cleaning will help your AC unit to function more efficiently, and potentially make it last longer too. Read on to learn how I removed the fan, outside panels and scrubbed away a lot of dirt and debris from my outdoor AC condenser. Editors note: This post originally ran in August 2009. In a related post about AC maintenance, one reader asked about cleaning an outdoor condenser unit, which prompted us to update this post with more pictures and information. If you find it helpful, give it a +1. Else, leave a comment and we’ll try to make it better. The coil transfers heat from your home to the outside, and this process works best when air can move freely. That’s why outdoor units have those big ‘ol fans. When dirt and leaves block up air passages, it’s that much harder to cycle enough air.

Plus, dirt and even dust can settle on the AC fins making them much less efficient. This in turn raises operational costs and shortens the lifespan of your compressor.
air duct cleaning in los angeles This project doesn’t require much in the way of tools.
shop vac portable air cleaner reviewsYou’ll need a nut driver to remove some metal screws, a hose, and a scrubber.
how to fix mold in air ductsI’ve got a handy brush that allows me to attach the hose and pump water through the bristles. Cleaning my condenser is pretty much the perfect application for it. It’s best to start by turning off the breaker supplying power to the unit, and hopefully your panel is labeled better than mine. Next, remove any nearby obstructions.
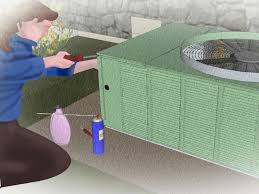
Most installation manuals will let you know the minimum clearance around and above the unit. If you don’t have access to the manual, try for at least two feet. My unit has louvered sides held together with a lot of metal screws, and I’d estimate I removed about 30 screws all together. Fortunately, they’re all the same. Just keep track of where they all go. If your unit has a grill instead of louvers, don’t even bother taking the sides off. You can effectively clean everything as is. You’ll see screws around the perimeter, at the corner where the top and sides meet (not the screws circling the fan). After you remove all those screws, the top (and fan) can be lifted off. Be careful because the fan is tethered with electrical wires. If the installers had any sense, they left a generous length of wire and you can lean the top nearby. This picture shows the electrical compartment. And here you see the compressor. The side grills have more screws at all the corners and along the bottom edge.

After you remove these screws you’ll see how the sides overlap and can be lifted up and off. It’s a good idea to remember where each panel was located. They should be identical, but this’ll help ensure that screw hole line up when you put it back together. Use your hose and brush to clean the grills, and hose down the fins (do not scrub the fins!). The fins maximize surface area for the heat exchange so if you accidentally mash them together, they won’t work nearly as well. Even an invisible layer of dust decreases efficiency so run your hose over everything (except the electric). I think this was the beginnings of a nest. You can see the fins and a few places where the fins are bent- probably from when the previous owner had the compressor replaced. This shows some of the gunk I found on the fins. And here’s everything bright and clean. What do you think? When was the last time you cleaned your outdoor unit?In summer months, your air conditioner is in constant use, be it window ac or room ac unit.

This results in the collection of lots of dust and dirt inside the ac unit. It is essential that your ac unit is clean for smooth functioning. When your heating and cooling system is not working efficiently, it results in high utility bills. To save you from all that trouble, Brown Heating & Cooling Inc. brings you the simple solution- on how to clean a window air conditioner. Cleaning your window air conditioning unit is a delicate task. You need to be very careful while cleaning your window AC. Follow the steps below to achieve a better cooling efficiency. Unplug your window air conditioner from all power sources. Remove all the cables connected to your air conditioner unit. If your ac unit is connected directly to your home’s fuse, it is best to shut off the master circuit breaker, only after that disconnect the ac unit. Do not forget to read all the instruction from the ac manufacturer’s instruction for discharging the capacitor and follow it. It is better if you keep it by your side while cleaning the AC, just in case you forget the next step.

Discharging the capacitor is extremely important as it is a device holding up extra charge or power, to kick starts the ac motor. This means that you need to ensure that there is no residual electricity left in the ac unit, before you start cleaning it up. Now, when the power is out we know that you won’t get zapped with a shock. It’s time to get down to business. Clean the dust on the outside of the ac unit. You can use a wet cloth but not the one that is soaking and dripping with water. It should be moist enough to thoroughly remove the dust on the body of the unit. While cleaning it, make sure that there is no dust or dirt remaining, so as it would not get inside the unit when you open it up. Now, remove the front cover with the help of a screwdriver or sturdy plastic hooks. If your AC unit’s cover is not bolted, you can simply use your hands to open it up. Keep the screws/bolts in a safe place and remember which one goes where, as you’ll need to reassemble them in the same order/place.
See if your unit also has a metal grill cover, if so, then carefully remove it. The metal grill’s edges can be sharp and may result in cuts if you are not paying attention. First, clean the cover with a wet soapy clean piece of cloth and then again with a dry cloth. You need to replace your window air conditioners dirty filter with a new one. During summer, your ac unit is in constant use. So, the filter will get dirty rather quickly. When the ac is being used for a maximum duration, you need to change it once every month to get the maximum efficiency out of it. But, if your ac unit has a reusable filter, it can be cleaned and replaced. You need to take it out and put it in a bucket. Fill the bucket with warm and soapy water, as warm water, can easily remove dirt and dust, in comparison to cold water. Place the filter in it for a couple of minutes and wash it with the water. If there is more dirt built up, then use a soft brush to thoroughly clean it out. After that, take it out and let it dry completely before setting up in ac unit.

If it is not completely dry, more dust and dirt can easily get stuck to it. You can use a dry piece of clean cloth to give it a good wipe too, before inserting it back in place. Now, it’s time to clean the inside of the AC unit. You can either use a clean moist piece of cloth to clean it, or vacuum it. You can use the vacuum extension to clean out all the dust and dirt accumulated in the AC, its bottom, inside of the front cover, sidewalls inside the ac as well as the metal grill if you got one. If you want to clean the fan blades and coils too, remember that these parts are very delicate and can be easily bent even with a little pressure. A bent fan blade can cause your ac to become even louder. So, use a soft clean piece of cloth to clean the dust and dirt off of it but do it extra carefully. If there appears to be any dent in the fins of your coil, then repair it gently using a fin comb. As for the motor housing, be sure to not mess with it while cleaning, because it is a very sensitive component of your ac.

So, while cleaning your ac unit, be extra careful and gentle. To clean the coils, gear up with your rubber gloves and protective goggles. Put the ac coil cleaner into the spray bottle, filling the half of it with the solution and the other half with plain water. Mix them well and spray the mixture lightly on the coils. Don’t let the mixture come in contact with the other parts of the air conditioner or the unit’s controls. You can use a clean dry cloth to cover the electrical controls and other sensitive areas near the coils, to avoid water damage. There is a reason why it is called air conditioning unit coil cleaner. It is made for this specific task alone. So, make sure that you use it. The solution may produce foam and vapor, but that is pretty normal. Now, allow the solution to stay for at least 10 to 15 minutes, for it to break down the dirt, mold, and algae. Then, pour clean warm water over the coils, or hose it with the water to clean off all the unwanted substances – dirt, mold, algae and the cleaning solution itself.

Make sure no amount of the solution remains in the ac. You have to drain the water from a condensate pan and let your air conditioning dry. You can either let it air dry or put it in the sun for an hour. That way, you can be sure that if the electric controls got wet in the process, it will dry too. After all the parts and the body are spotless and completely dry, reassemble your ac unit, all the nuts, and bolts. Don’t miss anything out! Better yet, go through the AC manufacturer’s instruction one more time. It will save you a lot of time and effort, rather than trying to figure things out on your own. Now connect your window air conditioner to its power source and start it up. When it is turned on, you may still find some remains of dirt and dust coming out from it, clean it up. Before you put away your ac unit for winter, repeat the cleaning process. And when you have reassembled it, keep it in a dry place, wrap it up with a clean plastic sheet and store in a dry place, so to prevent any growth of mold and mildew.